Security
Summary
- Security Primitives
- Authentication and service Accounts
- TLS Basics and in Kubernetes
- Certificates API
- KubeConfig
- API Groups
- Authorization
- Role Based Access Controls (RBAC)
- Cluster Roles and Role Bindings
- Service Accounts
- Image Security
- Security Contexts
- Network Policy
- Kubectx and Kubens command line utilities
Security Primitives
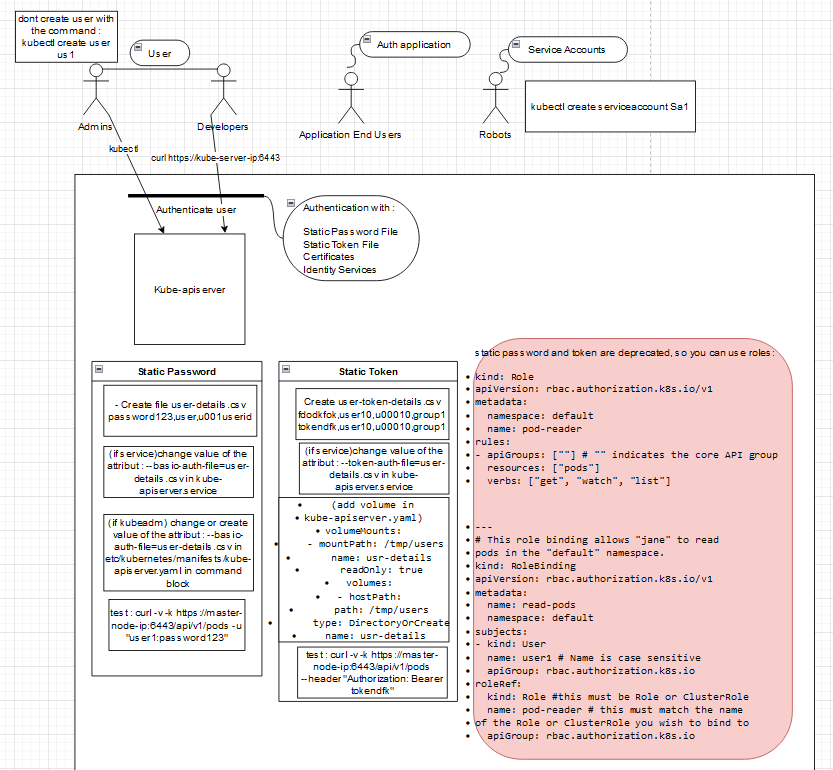
- Disable passwords and active SSH in evry host
- Who can access ?
* Files - Username and Passwords
* Fies - Username and token
* Certificates
* External Authentication providers - LDAP
* Service Accounts
- What can they do?
* RBAC Authorization
* ABAC Authorization
* Node Authorization
* Webhook Mode
Authentication and service Accounts
TLS Basics and in Kubernetesr
- What are TLS Certificates
TLS certificates are used to secure trafic between two points. the method is called encryption asymetric. You need public and privates keys.
a public key can have many extension (*.crt or *.pem or ...), also for private key (*.key or *-key.pem....)
for more information :
- .pem — This is a (Privacy-enhanced Electronic Mail) Base64 encoded DER certificate, enclosed between “—–BEGIN CERTIFICATE—–” and “—–END CERTIFICATE—–“
- .cer, .crt, and .der — Although usually in binary DER form, Base64-encoded certificates are also common (see .pem above).
- .p7b and .p7c — PKCS#7 SignedData structure without data, just certificate(s) or CRL(s).
- .p12 — PKCS#12 files may contain certificate(s) (public) and private keys (password protected).
- .pfx — PFX is the predecessor of PKCS#12. This type of file usually contains data in PKCS#12 format (e.g., with PFX files generated in IIS).
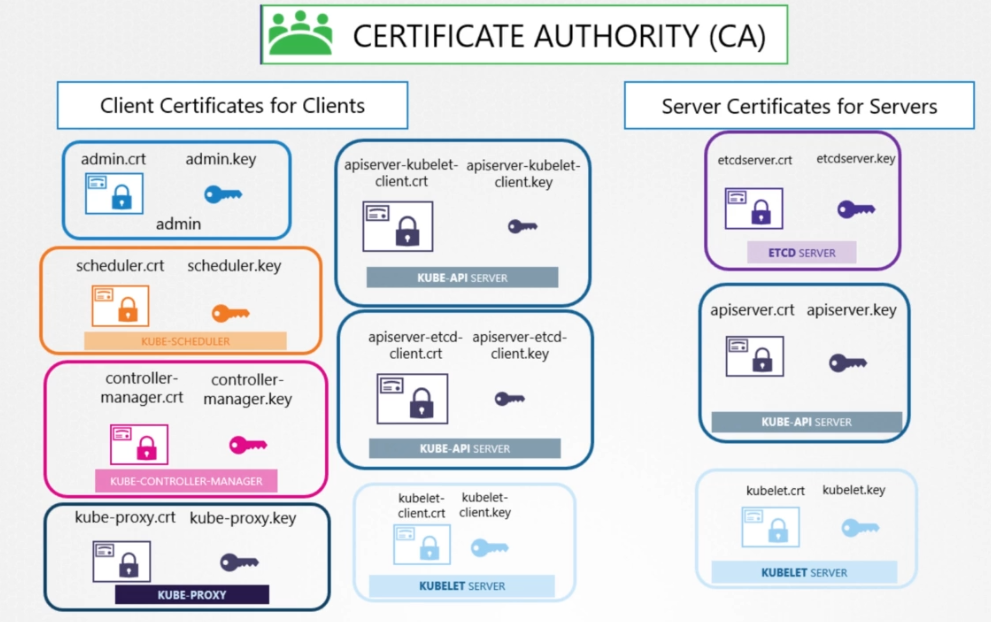
- How does Kubernetes use certificates
users like admin, Kube-Scheduler, Kube-Controller-Manager, Kube-Proxy they call Kube-API-Server
Kube-APi-Server is called by other component and it Call ETCD-Server and Kubelet-Server

In our case All certificates are generated with the same CA, but ETCD can be generated by other CA.
- How to generate them
Have the CA (Certificate Autority - Symantec, GlobalSign,digicert...) or generate it
the first thing is to generate the CA certificate : openssl genrsa -out ca.key 2048

then generate the CSR (Certificate Signing Request) : openssl req -new -key ca.key -subj "/CN=KUBERNETES-CA" -out ca.csr

Eventually sign the certificate : openssl x509 -req -in ca.csr -signkey ca.key -out ca.crt
Generate the User or admin certificate :
the first thing is to generate admin private key : openssl genrsa -out admin.key 2048

then generate the CSR (Certificate Signing Request) : openssl req -new -key admin.key -subj "/CN=Kube-admin" -out admin.csr

Eventually sign the certificate : openssl x509 -req -in admin.csr -CA ca.crt  -CAkey ca.key -out admin.crt
- How to configure them
for APISERVER:
apiVersion: v1
clusters:
- cluster:
certificate-authority: ca.crt
server: https://kube-apiserver:6443
name: kubernetes
kind: Config
users:
- name: kubernetes-admin
user:
client-certificate: admin.crt
client-key: admin.key
Call api server with certificate :
curl https://kube-apiserver:6443/api/v1/pods \
--key admin.key --cert admin.crt
--cacert ca.crt
for ETCD
- etcd
- --advertise-client-urls=https://127.0.0.1:2379
- --key-file=/path-to-certs/etcdserver.key
- --cert-file=/path-to-certs/etcdserver.crt
- --client-cert-auth=true
- --data-dir=/var/lib/etcd
- --initial-advertise-peer-urls=https://127.0.0.1:2380
- --initial-cluster=master=https://127.0.0.1:2380
- --listen-client-urls=https://127.0.0.1:2379
- --listen-peer-urls=https://127.0.0.1:2380
- --name=master
- --peer-cert-file=/path-to-certs/etcdpeer1.crt
- --peer-client-cert-auth=true
- --peer-key-file=/etc/kubernetes/pki/etcd/peer.key
- --peer-trusted-ca-file=/etc/kubernetes/pki/etcd/ca.crt
- --snapshot-count=10000
- --trusted-ca-file=/etc/kubernetes/pki/etcd/ca.crt
- How to view them
- How to troubleshoot issues related to certificates
You can also prepare a table to organise certificates
| Component | Type | Certificate Path | CN Name | ALT Names | Organization | Issuer | Expiration |
| Server | Type | /etc/kubernetets/pki/apiserver.crt | kube-apiserver | DNS:master DNS:kuberntetes DNS:kuberenetes.default | server | self | Feb 805:52 2019 |
Certificates API
Users create CSR Object to call api server like:
curl https://kube-apiserver:6443/api/v1/pods \
--key admin.key --cert admin.crt
--cacert ca.crt
to do that we should :
- Review Requests
- Approve request
- Share certs to users
Steps to apply :
openssl genrsa -out jane.key 2048   ==> jane.key

openssl req -new -key jane.key -subj "/CN=jane" -out jane.csr


jane.csr
-----BEGIN CERTIFICATE REQUEST-----
MIICWDCCAUACAQAwEzERMA8GA1UEAwwIbmV3LXVzZXIwggEiMA0GCSqGSIb3DQEB
AQUAA4IBDwAwggEKAoIBAQDO0WJW+DXsAJSIrjpNo5vRIBplnzg+6xc9+UVwkKi0
LfC27t+1eEnON5Muq99NevmMEOnrDUO/thyVqP2w2XNIDRXjYyF40FbmD+5zWyCK
9w0BAQsFAAOCAQEAS9iS6C1uxTuf5BBYSU7QFQHUzalNxAdYsaORRQNwHZwHqGi4
hOK4a2zyNyi44OOijyaD6tUW8DSxkr8BLK8Kg3srREtJql5rLZy9LRVrsJghD4gY
P9NL+aDRSxROVSqBaB2nWeYpM5cJ5TF53lesNSNMLQ2++RMnjDQJ7juPEic8/dhk
Wr2EUM6UawzykrdHImwTv2mlMY0R+DNtV1Yie+0H9/YElt+FSGjh5L5YUvI1Dqiy
4l3E/y3qL71WfAcuH3OsVpUUnQISMdQs0qWCsbE56CC5DhPGZIpUbnKUpAwka+8E
vwQ07jG+hpknxmuFAeXxgUwodALaJ7ju/TDIcw==
-----END CERTIFICATE REQUEST-----
cat jane.csr | base64

LS0tLS1CRUdJTiBDRVJUSUZJQ0FURS0tLS0tCk1JSURDakNDQWZLZ0F3SUJBZ0lVRmwy
Q2wxYXoxaWl5M3JNVisreFRYQUowU3dnd0RRWUpLb1pJaHZjTkFRRUwKQlFBd0ZURVRN
QkVHQTFVRUF4TUthM1ZpWlhKdVpYUmxjekFlRncweE9UQXlNVE14TmpNeU1EQmFGd1dn
Y0ZFeDl2ajNuSXY3eFdDS1NIRm5sU041c0t5Z0VxUkwzTFM5V29GelhHZDdWCmlEZ2FO
MVVRMFBXTVhjN09FVnVjSWc1Yk4weEVHTkVwRU5tdUlBNlZWeHVjS1h6aG9ldDY0MEd1
MGU0YXFKWVIKWmVMbjBvRTFCY3dod2xic0I1ND0KLS0tLS1FTkQgQ0VSVElGSUNBVEUt
LS0tLQo=
into jane-csr.yaml put
apiVersion: certificates.k8s.io/v1beta1
kind: CertificateSigningRequest
metadata:
name: jane
spec:
groups:
- system:authenticated
usages:
- digital signature
- key encipherment
- server auth
request:

LS0tLS1CRUdJTiBDRVJUSUZJQ0FURS0tLS0tCk1JSURDakNDQWZLZ0F3SUJBZ0lVRmwy
Q2wxYXoxaWl5M3JNVisreFRYQUowU3dnd0RRWUpLb1pJaHZjTkFRRUwKQlFBd0ZURVRN
QkVHQTFVRUF4TUthM1ZpWlhKdVpYUmxjekFlRncweE9UQXlNVE14TmpNeU1EQmFGd1dn
Y0ZFeDl2ajNuSXY3eFdDS1NIRm5sU041c0t5Z0VxUkwzTFM5V29GelhHZDdWCmlEZ2FO
MVVRMFBXTVhjN09FVnVjSWc1Yk4weEVHTkVwRU5tdUlBNlZWeHVjS1h6aG9ldDY0MEd1
MGU0YXFKWVIKWmVMbjBvRTFCY3dod2xic0I1ND0KLS0tLS1FTkQgQ0VSVElGSUNBVEUt
LS0tLQo=
Check requests :
kubectl get csr
NAME AGE REQUESTOR CONDITION
jane 10m admin@example.com Pending
Approve requsts:
kubectl certificate approve jane
jane approved!
Checks jane requests after approve:
kubectl get csr jane -o yaml
apiVersion: certificates.k8s.io/v1beta1
kind: CertificateSigningRequest
metadata:
creationTimestamp: 2019-02-13T16:36:43Z
name: new-user
spec:
groups:
- system:masters
- system:authenticated
usages:
- digital signature
- key encipherment
- server auth
username: kubernetes-admin
status:
certificate:
LS0tLS1CRUdJTiBDRVJUSUZJQ0FURS0tLS0tCk1JSURDakNDQWZLZ0F3SUJBZ0lVRmwy
Q2wxYXoxaWl5M3JNVisreFRYQUowU3dnd0RRWUpLb1pJaHZjTkFRRUwKQlFBd0ZURVRN
QkVHQTFVRUF4TUthM1ZpWlhKdVpYUmxjekFlRncweE9UQXlNVE14TmpNeU1EQmFGd1dn
Y0ZFeDl2ajNuSXY3eFdDS1NIRm5sU041c0t5Z0VxUkwzTFM5V29GelhHZDdWCmlEZ2FO
MVVRMFBXTVhjN09FVnVjSWc1Yk4weEVHTkVwRU5tdUlBNlZWeHVjS1h6aG9ldDY0MEd1
MGU0YXFKWVIKWmVMbjBvRTFCY3dod2xic0I1ND0KLS0tLS1FTkQgQ0VSVElGSUNBVEUt
LS0tLQo=
conditions:
- lastUpdateTime: 2019-02-13T16:37:21Z
message: This CSR was approved by kubectl certificate approve.
reason: KubectlApprove
type: Approved
Decode certificate
echo “LS0...Qo=” | base64 --decode

-----BEGIN CERTIFICATE -----
MIICWDCCAUACAQAwEzERMA8GA1UEAwwIbmV3LXVzZXIwgg
AQUAA4IBDwAwggEKAoIBAQDO0WJW+DXsAJSIrjpNo5vRIB
LfC27t+1eEnON5Muq99NevmMEOnrDUO/thyVqP2w2XNIDR
y3BihhB93MJ7Oql3UTvZ8TELqyaDknRl/jv/SxgXkok0AB
IF5nxAttMVkDPQ7NbeZRG43b+QWlVGR/z6DWOfJnbfezOt
EcCXAwqChjBLkz2BHPR4J89D6Xb8k39pu6jpyngV6uP0tI
j2qEL+hZEWkkFz80lNNtyT5LxMqENDCnIgwC4GZiRGbrAg
9w0BAQsFAAOCAQEAS9iS6C1uxTuf5BBYSU7QFQHUzalNxA
hOK4a2zyNyi44OOijyaD6tUW8DSxkr8BLK8Kg3srREtJql
P9NL+aDRSxROVSqBaB2nWeYpM5cJ5TF53lesNSNMLQ2++R
Wr2EUM6UawzykrdHImwTv2mlMY0R+DNtV1Yie+0H9/YElt
4l3E/y3qL71WfAcuH3OsVpUUnQISMdQs0qWCsbE56CC5Dh
vwQ07jG+hpknxmuFAeXxgUwodALaJ7ju/TDIcw==
-----END CERTIFICATE -----
KubeConfig
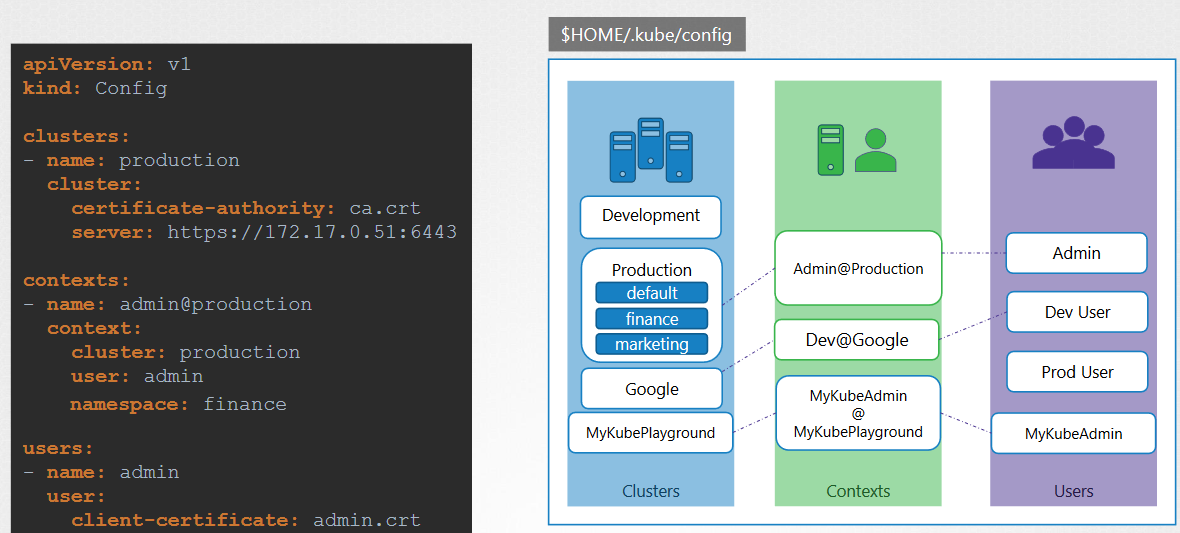
config file hosted into $HOME/.kube/config has tree sections : Clusters (dev, production, Google...) , Context (dev@dev_User, admin@Google) and Users(Admin, dev_User, Pord_User)
The context : what user can acces a wich Cluster
Config file in a yaml format :
Kubectl config
apiVersion: v1
kind: Config
current-context: kubernetes-admin@kubernetes
clusters:
- cluster:
certificate-authority-data: REDACTED
server: https://172.17.0.5:6443
name: kubernetes
contexts:
- context:
cluster: kubernetes
user: kubernetes-admin
name: kubernetes-admin@kubernetes
users:
- name: kubernetes-admin
user:
client-certificate-data: REDACTED
client-key-data: REDACTED
You can use the command :
kubectl config view
You can put the certificate into config file but with 64 base :
Certificates in KubeConfig
apiVersion: v1
kind: Config
clusters:
- name: production
cluster:
certificate-authority-data:
LS0tLS1CRUdJTiBDRVJU
SUZJQ0FURSBSRVFVRVNULS0tLS0KTUlJ
Q1dEQ0NBVUFDQVFBd0V6RVJNQThHQTFV
RUF3d0libVYzTFhWelpYSXdnZ0VpTUEw
R0NTcUdTSWIzRFFFQgpBUVVBQTRJQkR3
QXdnZ0VLQW9JQkFRRE8wV0pXK0RYc0FK
this a summary of kubconfig
cluster with namespaces are attached to Users into the context
API Groups
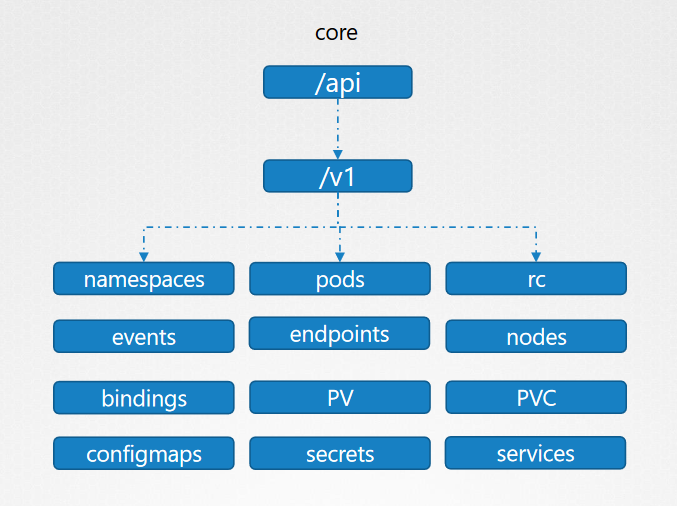
API groups make it easier to extend the Kubernetes API. The API group is specified in a REST path and in the apiVersion field of a serialized object. There are several API groups in Kubernetes: The core (also called legacy) group is found at REST path /api/v1
api groups are : /metrics , /healthz, /version, /api, /apis, /logs and you can call them by url : curl https://kube-master:6443/api/v1/pods or curl https://kube-master:6443/version
we distinguish core (/api) and named api groups (/apis)
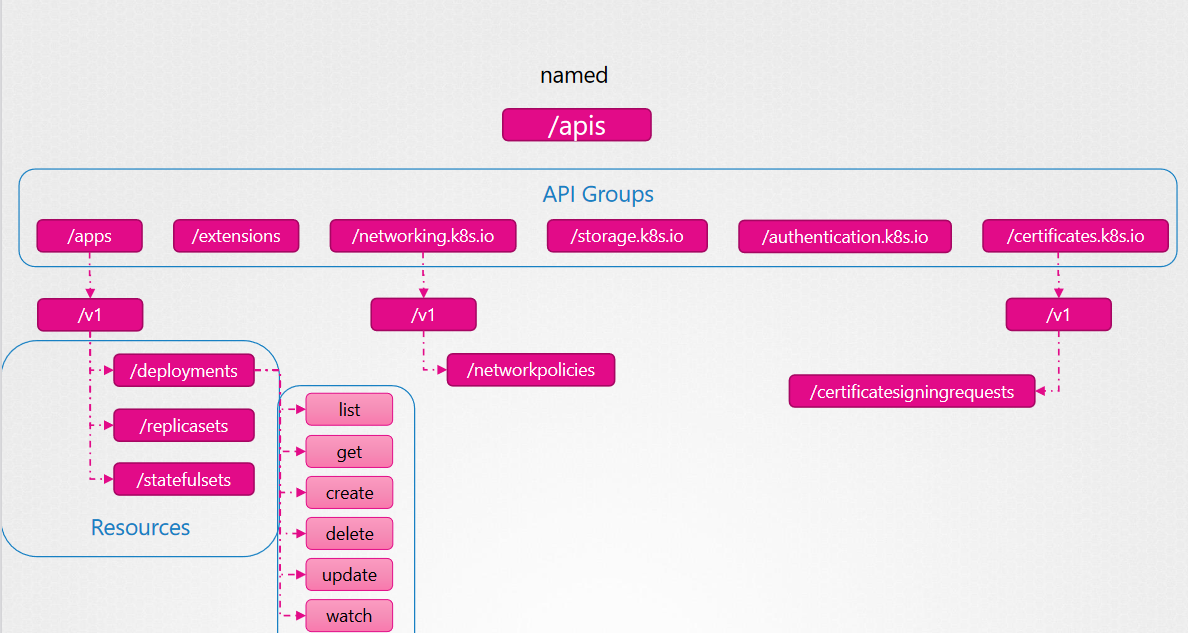
Get the hole apis by url via proxy : 'kubectl proxy' then open other tab in the same session and execute 'curl https://127.0.0.1:8001 -k '
there is a differenet between kube proxy and kubectl proxy (is a proxy created bu kube control to access to api server)
Authorization
Authorization help us to deny for a developper to delete à cluster or a node or to get logs production ...
There is multiple mechanisme of authorization : Node, ABAC, RBAC and Webhook, also (AlwaysAllow : allow resuests and AlwaysDeny: Always deny requests)
- Node : the user call api server and kublete also, Kublet call api server to get informations about services, endpoints, pods, ... and write opertaions like node status, pod status, events...
so authorizations are used by certificates or token but also we can limit kublete to have minimal permission to remove or add
- ABAC (Attribute-based access control): defines an access control paradigm whereby access rights are granted to users through the use of policies which combine attributes together
for example, a dev user can view, create and delete pods but for a security user can view and approve CSR. by sending a json format file via api :
{"apiVersion": "abac.authorization.kubernetes.io/v1beta1", "kind": "Policy", "spec": {"user": "alice", "namespace": "*", "resource": "*", "apiGroup": "*"}}

- RBAC (Role-based access control) : you create a role and you associate users to this role. for example role developer with view, create, delete asssociated to developpers users 1, 2 and 3.

- Webhook : for example there is an agent policy who allow or deny access, a dev-user-1 call api server to delete pod, the webhook requets agent delete access to pod, then the agent response with Yes or no.


ExecStart=/usr/local/bin/kube-apiserver \\
--advertise-address=${INTERNAL_IP} \\
--allow-privileged=true \\
--apiserver-count=3 \\
--authorization-mode=Node,RBAC,Webhook\\
--bind-address=0.0.0.0 \\
--enable-swagger-ui=true \\
--etcd-cafile=/var/lib/kubernetes/ca.pem \\
--etcd-certfile=/var/lib/kubernetes/apiserver-etcd-client.crt \\
--etcd-keyfile=/var/lib/kubernetes/apiserver-etcd-client.key \\
--etcd-servers=https://127.0.0.1:2379 \\
--event-ttl=1h \\
--kubelet-certificate-authority=/var/lib/kubernetes/ca.pem \\
--kubelet-client-certificate=/var/lib/kubernetes/apiserver-etcd-client.crt \\
--kubelet-client-key=/var/lib/kubernetes/apiserver-etcd-client.key \\
--service-node-port-range=30000-32767 \\
--client-ca-file=/var/lib/kubernetes/ca.pem \\
--tls-cert-file=/var/lib/kubernetes/apiserver.crt \\
--tls-private-key-file=/var/lib/kubernetes/apiserver.key \\
--v=2
Role Based Access Controls (RBAC)
1- We create a role file developer-role.yaml :
kubectl create -f developer-role.yamlapiVersion:rbac.authorization.k8s.io/v1
kind:Role
metadata:
name:developer
rules:
-apiGroups:[""]
resources:["pods"]
verbs:["list“,"get",“create“, “update“, “de
developer-role.yaml
-apiGroups:[""]
resources:[“ConfigMap"]
verbs:[“create“]or with command :
kubectl create role developer --verb=list,create,delete --resources=pods
2- We create a binding role file to bind users with role :
kubectl create -f devuser-binding.yamlapiVersion: rbac.authorization.k8s.io/v1
kind: RoleBinding
metadata:
name: devuser-developer-binding
subjects:
- kind: User
name: dev-user
apiGroup: rbac.authorization.k8s.io
roleRef:
kind: Role
name: developer
apiGroup: rbac.authorization.k8s.ioor with command :
kubectl create rolebinding --helpkubectl create rolebinding dev-user-binding --role=developer --user=dev-user
3- Check creations
kubectl get roleskubectl get rolebindingskubectl describe role developerkubectl describe rolebinding dev-binding4- check access
kubectl auth can-i create deployments ===> yeskubectl auth can-i delete nodes ===> no
kubectl auth can-i create deployments --as dev-user --namespace test
4- explore environnements
in /etc/kubernetes/manifests/api-server check authorization-mode attribut
or with command : ps -aux | grep authorizationkubectl get roles -A --no-headers | wc -lkubectl describe role kube-proxy -n kube-system
know wich account is attached to a role :
kubectl describe rolebindingscheck user : kubectl --as dev-user get pod dark-blue-app -n bluekubectl edit role developer -n blue ==> change or modify a role
give permission to user to create deployment
into role file add apigroups "apps" and verbs create
Cluster Roles and Role Bindings
There is namespace scope or objects like pods, replicasets ... and cluster scope
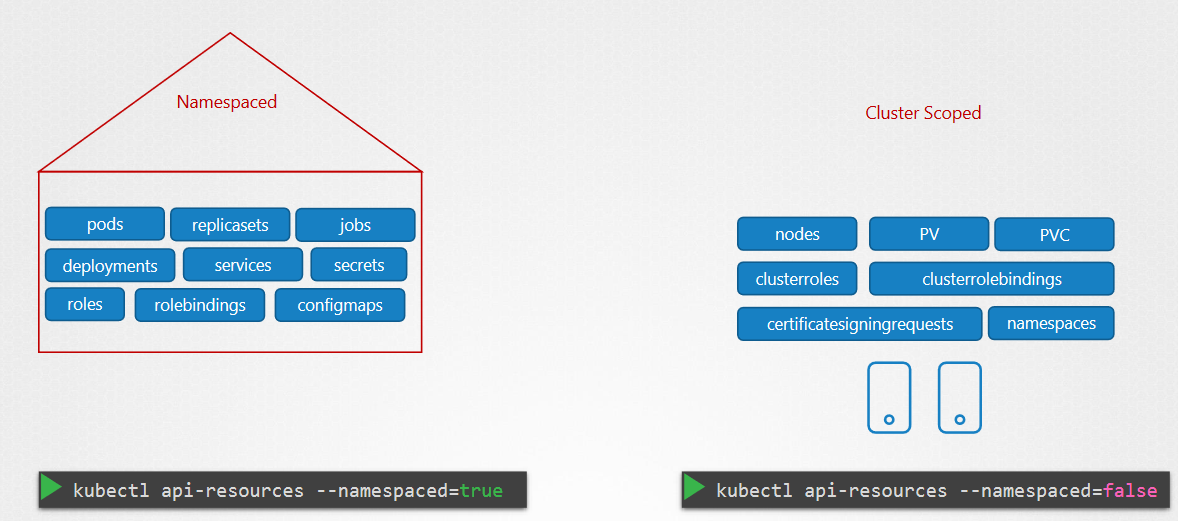
in this section we are talking about Cluster coped. in reality is like namespaced scope role and bindingrole
- Create cluster role file :
apiVersion: rbac.authorization.k8s.io/v1
kind: ClusterRole
metadata:
name: cluster-administrator
rules:
- apiGroups: [""]
resources: [“nodes"]
verbs: ["list“, "get", “create“, “delete"]
- Create cluster binding role
apiVersion: rbac.authorization.k8s.io/v1
kind: ClusterRoleBinding
metadata:
name: cluster-admin-role-binding
subjects:
- kind: User
name: cluster-admin
apiGroup: rbac.authorization.k8s.io
roleRef:
kind: ClusterRole
name: cluster-administrator
apiGroup: rbac.authorization.k8s.io
kubectl create -f nameofclusterrolefile.yaml and also kubectl create -f nameoffileclusterbindingrole.yaml
Service Accounts
There is user account and service account. Service account is ised by rebot. For example an app gets metrics from the api server, it connect to the api server by using a service account.
Create a service account :
kubectl create serviceaccount dashboard-sa
creating service account, create a secret token automatically, you can see the token by this command :
kubectl get serviceaccountkubectl describe serviceaccount dashboard-sa ==> in description you can see the name of the secret object of the tokenYou can call the api with the token : curl https://192.168.56.70:6443/api -insecure --header "Authorization: Bearer ejdkfhjk..."
You can also create a role for this user service and binding it then call the api with the token
If a pod should use this token, add serviceAccountName : dashboard-sa in spec and in the same level of containers and add
in the version 1.24 of kub, you should create yourself a token :
kubectl create serviceaccount dashboard-sakubectl create token dashboard-sa
to edit the token :
jq -R 'split(".") | select(length > 0) | .[0],.[1] | @base64d | fromjson' <<<< ejhfkkfjjf...
add ther token a secret object that you create :
kubectl apply -f - <
Image Security
if you use public image, think to put the registry, the user account and the image repository => image : docker.io/library/nginx
if you use a private repository, with docker you can access with the command : docker login private-registry.io and run a container with the image in the private registry => docker run private-registry.io/apps/internal-app
In K8S :
you should add the FQDN of the image : image : private-registry.io/apps/internal-app and the imagePullSecrets : name: regcred that you create bellow
create a secret for you private registry :
kubectl create secret docker-registry regcred \

--docker-server=private-registry.io

--docker-username=registry-user

--docker-password=registry-password

--docker-email=dfdfd@gmail.com
Security Contexts
A security context defines privilege and access control settings for a Pod or Container. Security context settings include, but are not limited to:
You can define a security context innto the pod (pod scope) or into the container (container scope)
Security context solve problems bellow but not only :
-
Discretionary Access Control: Permission to access an object, like a file, is based on user ID (UID) and group ID (GID).
-
Security Enhanced Linux (SELinux): Objects are assigned security labels.
-
Running as privileged or unprivileged.
-
Linux Capabilities: Give a process some privileges, but not all the privileges of the root user.
-
AppArmor: Use program profiles to restrict the capabilities of individual programs.
-
Seccomp: Filter a process's system calls.
-
allowPrivilegeEscalation: Controls whether a process can gain more privileges than its parent process. This bool directly controls whether theno_new_privsflag gets set on the container process.allowPrivilegeEscalationis always true when the container:- is run as privileged, or
- has
CAP_SYS_ADMIN
-
readOnlyRootFilesystem: Mounts the container's root filesystem as read-only.
Network Policy
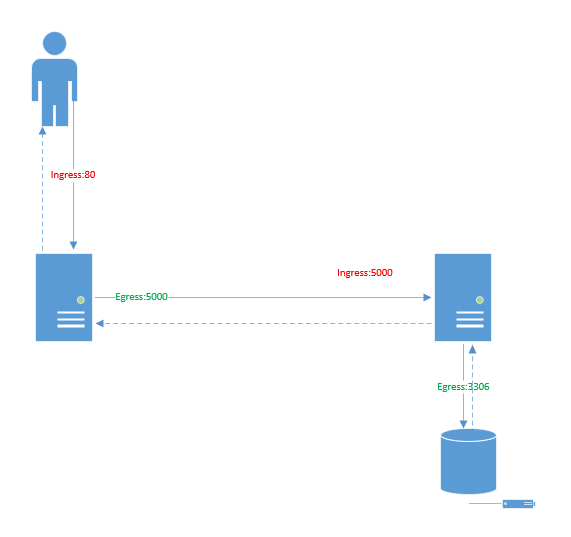
In this example, the user call the ihm with port 80 ( ingress flow), then the server call the api with the port 5000(egress flow).
for the Api,, it recieves request from the port 5000 (ingress) and call database with the port 3306 (egress)
The database recieve the call from the port 3306 (ingress)
to avoid that the user or the web server call directly database we use NetworkPolicy object.
The Kubernetes Network Policy API supports the following features:
- Policies are namespace scoped
- Policies are applied to pods using label selectors
- Policy rules can specify the traffic that is allowed to/from pods, namespaces, or CIDRs
- Policy rules can specify protocols (TCP, UDP, SCTP), named ports or port numbers
apiVersion: networking.k8s.io/v1
kind: NetworkPolicy
metadata:
  name: test-network-policy
  namespace: default
spec:
  podSelector:
    matchLabels:
      role: db
  policyTypes:
    - Ingress
    - Egress
  ingress:
    - from:
        - ipBlock:
            cidr: 172.17.0.0/16
            except:
              - 172.17.1.0/24
        - namespaceSelector:
            matchLabels:
              project: myproject
        - podSelector:
            matchLabels:
              role: frontend
      ports:
        - protocol: TCP
          port: 6379
  egress:
    - to:
        - ipBlock:
            cidr: 10.0.0.0/24
      ports:
        - protocol: TCP
          port: 5978
ATTENTION: ingress or egress object have service scope also and can add more details
Kubectx and Kubens command line utilities
Kubens:
This tool allows users to switch between namespaces quickly with a simple command.
Installation:
-
sudo git clone https://github.com/ahmetb/kubectx /opt/kubectx
-
sudo ln -s /opt/kubectx/kubens /usr/local/bin/kubens
Syntax:
To switch to a new namespace:
kubens
To switch back to previous namespace:
kubens -
Kubectx:
Reference: https://github.com/ahmetb/kubectx
With this tool, you don't have to make use of lengthy “kubectl config” commands to switch between contexts. This tool is particularly useful to switch context between clusters in a multi-cluster environment.
Installation:
-
sudo git clone https://github.com/ahmetb/kubectx /opt/kubectx
-
sudo ln -s /opt/kubectx/kubectx /usr/local/bin/kubectx
Syntax:
To list all contexts:
kubectx
To switch to a new context:
kubectx
To switch back to previous context:
kubectx -
To see current context:
kubectx -c